A Tale of Two Water Towers: Difference between revisions
| (10 intermediate revisions by the same user not shown) | |||
| Line 20: | Line 20: | ||
I first saw this style water tower at Jack Haskin's [[Able Springs & North Texas Railroad]]. There are several such water towers at various towns and siding on his layout. They add a touch of realism, as most Texas towns boast at least one water tower. | I first saw this style water tower at Jack Haskin's [[Able Springs & North Texas Railroad]]. There are several such water towers at various towns and siding on his layout. They add a touch of realism, as most Texas towns boast at least one water tower. | ||
[[File:AbleSpringsNorthernWaterTower.JPG|thumb|center|300px|A photo of the [[Able Springs & North Texas Railroad]]. Notice the water town on the left edge of the photo. Photo by Rick White.]] | |||
Surprisingly, these model water towers are inexpensive to construct. The water tank is a steel, single use freon tank. You can obtain these from refrigeration repair companies. They are disposed of once empty. Another source is disposable helium tanks sold at Walmart and other retail outlets. | Surprisingly, these model water towers are inexpensive to construct. The water tank is a steel, single use freon tank. You can obtain these from refrigeration repair companies. They are disposed of once empty. Another source is disposable helium tanks sold at Walmart and other retail outlets. | ||
| Line 26: | Line 28: | ||
<gallery widths="300px" heights="300px"> | <gallery widths="300px" heights="300px"> | ||
File:Rough Dimensions Model Water tower Eighth Inch Scale.jpg|Rough Dimensions for a model water tower. | |||
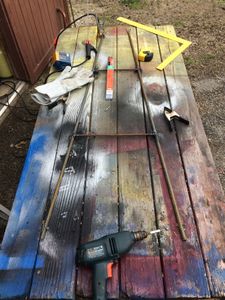
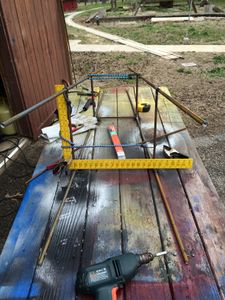
File:WaterTower StrutJig.jpg|Start by welding a pair of A-frame support structures. Make a jig to hold the parts in place while welding. I used an old picnic table. Yes, I started a couple of small fires, but no real damage done. | File:WaterTower StrutJig.jpg|Start by welding a pair of A-frame support structures. Make a jig to hold the parts in place while welding. I used an old picnic table. Yes, I started a couple of small fires, but no real damage done. | ||
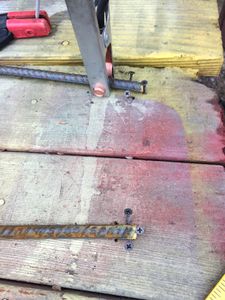
File:WaterTower WeldingJig.jpg|The welding jig can be very simple. Lay out the rebar on a flat wooden surface, then drive sheetrock screws into the wood as shown. | File:WaterTower WeldingJig.jpg|The welding jig can be very simple. Lay out the rebar on a flat wooden surface, then drive sheetrock screws into the wood as shown. | ||
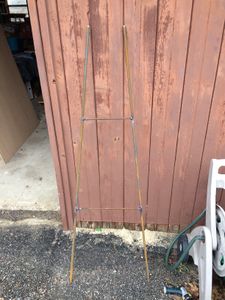
File:Completed WaterTower Support.jpg|A completed A-frame support. Make two of these, then weld together as shown in the next photo. These were welded using a Lincoln "tomb stone" welder set at 90 amps, using #6013 1/8 inch rods. | File:Completed WaterTower Support.jpg|A completed A-frame support. Make two of these, then weld together as shown in the next photo. These were welded using a [https://www.google.com/search?q=Lincoln+tomb+stone+welder Lincoln "tomb stone" welder] set at 90 amps, using #6013 1/8 inch rods. | ||
File:WaterTower AFrame Assembly.jpg|Place the two completed A-Frame supports next to each other. Weld them together with 3/8 inch rebar cut to the appropriate lengths. Make sure the assembly is square before welding. | File:WaterTower AFrame Assembly.jpg|Place the two completed A-Frame supports next to each other. Weld them together with 3/8 inch rebar cut to the appropriate lengths. Make sure the assembly is square before welding. | ||
File:WaterTower WeldingTank On AFrame.jpg|Remove the handle and valve from the top of the freon tank. Sand down to the bare metal where the struts will be welded. The tank is welded upside-down onto the A-Frame support structure. The valve stem can be left in-tack in order to hold the one inch PVC pipe supply line. The tank wall is thin so use a low power setting (40 amps) and a small diameter stick (1/16 inch). Or, use a wire MIG welder. | File:WaterTower WeldingTank On AFrame.jpg|Remove the handle and valve from the top of the freon tank. Sand down to the bare metal where the struts will be welded. The tank is welded upside-down onto the A-Frame support structure. The valve stem can be left in-tack in order to hold the one inch PVC pipe supply line. The tank wall is thin so use a low power setting (40 amps) and a small diameter stick (1/16 inch). Or, use a wire MIG welder. | ||
File:WaterTower Footings.jpg|I blew holes in the tank walls while welding to the A-Frame supports. These mistakes were covered using three inch long angle iron (1 inch by 1 inch), welded to the legs. | |||
File:WaterTower Painted.jpg|The areas around the welds are cleaned, and the two water tanks are painted with "shaker can" enamel paint. | |||
File:WaterTower Lettered.jpg|Most modern water towers are painted with the town name along with the town's logo. Simple logos were designed for each town to make the towers more interesting to visitors. The logos and lettering were designed using a free program named [https://inkscape.org/en/ Inkscape]. Paint masks were cut with a computer-driven vinyl cutter. | |||
File:WaterTower Transportation.jpg|The water towers were transported on the Annetta Valley & Western Railroad to their destination. | |||
File:WaterTower ShadyRest AVWRR.jpg|The second water tower was installed at the new industrial siding at Shady Rest on the [[Annetta Valley & Western Railroad]]. | |||
</gallery> | |||
== Other Water Tower Sightings == | |||
<gallery widths="300px" heights="300px"> | |||
File:RidgeLiveSteamers WaterTower.jpg|[[Ridge Live Steamers]] in Flordia. Photo by Dr. C. David Hemp. | |||
File:ShaneMurphy WaterTower.jpg|Shane Murphy posted on Backyard Railroading: I built this water tower about a year ago for a friends 7.5" gauge RR. The water tank is an A/C freon tank, hat on top is a funnel, legs and bracing just fabricated from angle iron, "fill pipe" up the center is 1" conduit, railing is 3/16" rod with galvanized wire wrapped 360 deg around the platform. Just the other day, one of the guys that helps out attached the solar panel up top and a 12 VDC battery down low, and this now powers about 1/6 th of the signal system on the railroad. | |||
File:Cashton water tower.jpg|Cashton water tower. Location unknown. | |||
</gallery> | </gallery> | ||
Latest revision as of 23:17, 23 February 2016
31 March 2015

Every railroad is dependent upon it customers for survival. A healthy business climate in the areas of service will help guarantee success for the railroad. Therefore, it is incumbent upon the railroad to do all it can to spur growth in local business. Each siding, no matter how small, can add to the bottom line.
The managers of the Annetta Valley & Western Railroad considered how to encourage growth in the towns and sidings it services. Many issues were discussed, but one in particular "bubbled" to the top: water. It is recognized that every town and siding relies on a plentiful water supply for successful growth.
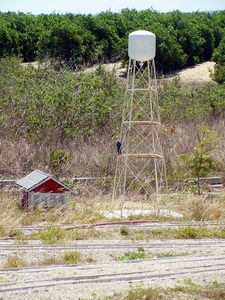
The most obvious example is the cattle exchange at West Fork. This siding has relied on water pumped from the ground by a windmill. The increase in the number of cattle shipped through the exchange has outgrown the amount of water that can be supplied by the windmill.
Another siding with increasing water needs is Shady Rest. Real estate magnates are promoting an industrial development next to the spur track. A water tower is required to provide the needs of the industries targeted for the development.
The AV&WRR board of directors approved loans for the construction of two 75,000 gallon water towers, one each for West Fork and Shady Rest. The railroad oversaw the construction and erection of the two towers. The project was completed on March 27, 2015.
Construction
I first saw this style water tower at Jack Haskin's Able Springs & North Texas Railroad. There are several such water towers at various towns and siding on his layout. They add a touch of realism, as most Texas towns boast at least one water tower.

Surprisingly, these model water towers are inexpensive to construct. The water tank is a steel, single use freon tank. You can obtain these from refrigeration repair companies. They are disposed of once empty. Another source is disposable helium tanks sold at Walmart and other retail outlets.
The legs and cross-braces are rebar, which is available at most building supply stores. The 1/2 inch rebar used for the legs is purchased in ten foot lengths. Simply cut them in half for the proper length of five feet.
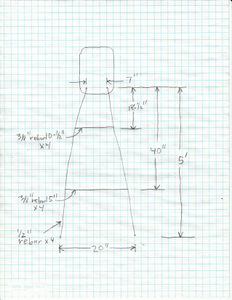
Rough Dimensions for a model water tower.
Start by welding a pair of A-frame support structures. Make a jig to hold the parts in place while welding. I used an old picnic table. Yes, I started a couple of small fires, but no real damage done.
The welding jig can be very simple. Lay out the rebar on a flat wooden surface, then drive sheetrock screws into the wood as shown.
A completed A-frame support. Make two of these, then weld together as shown in the next photo. These were welded using a Lincoln "tomb stone" welder set at 90 amps, using #6013 1/8 inch rods.
Place the two completed A-Frame supports next to each other. Weld them together with 3/8 inch rebar cut to the appropriate lengths. Make sure the assembly is square before welding.
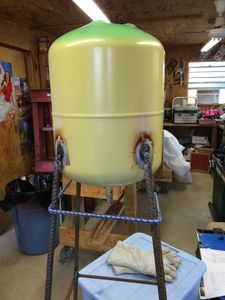
Remove the handle and valve from the top of the freon tank. Sand down to the bare metal where the struts will be welded. The tank is welded upside-down onto the A-Frame support structure. The valve stem can be left in-tack in order to hold the one inch PVC pipe supply line. The tank wall is thin so use a low power setting (40 amps) and a small diameter stick (1/16 inch). Or, use a wire MIG welder.
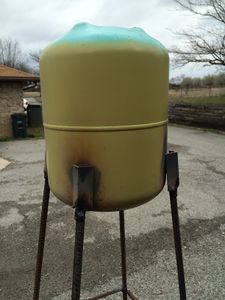
I blew holes in the tank walls while welding to the A-Frame supports. These mistakes were covered using three inch long angle iron (1 inch by 1 inch), welded to the legs.
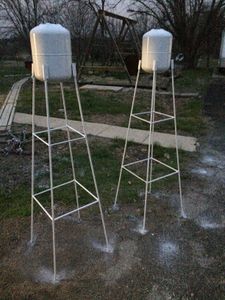
The areas around the welds are cleaned, and the two water tanks are painted with "shaker can" enamel paint.
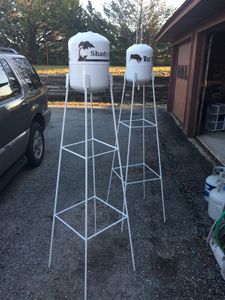
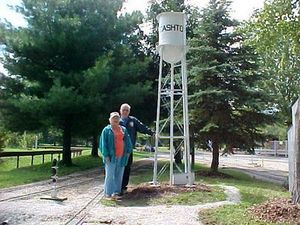
Most modern water towers are painted with the town name along with the town's logo. Simple logos were designed for each town to make the towers more interesting to visitors. The logos and lettering were designed using a free program named Inkscape. Paint masks were cut with a computer-driven vinyl cutter.

The water towers were transported on the Annetta Valley & Western Railroad to their destination.
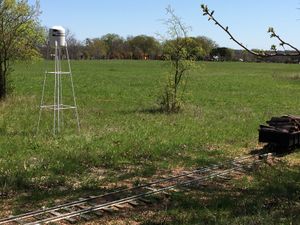
The second water tower was installed at the new industrial siding at Shady Rest on the Annetta Valley & Western Railroad.


Other Water Tower Sightings
Ridge Live Steamers in Flordia. Photo by Dr. C. David Hemp.
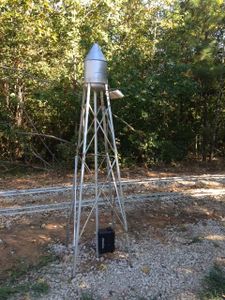
Shane Murphy posted on Backyard Railroading: I built this water tower about a year ago for a friends 7.5" gauge RR. The water tank is an A/C freon tank, hat on top is a funnel, legs and bracing just fabricated from angle iron, "fill pipe" up the center is 1" conduit, railing is 3/16" rod with galvanized wire wrapped 360 deg around the platform. Just the other day, one of the guys that helps out attached the solar panel up top and a 12 VDC battery down low, and this now powers about 1/6 th of the signal system on the railroad.
Cashton water tower. Location unknown.


