Emery Ohlenkamp
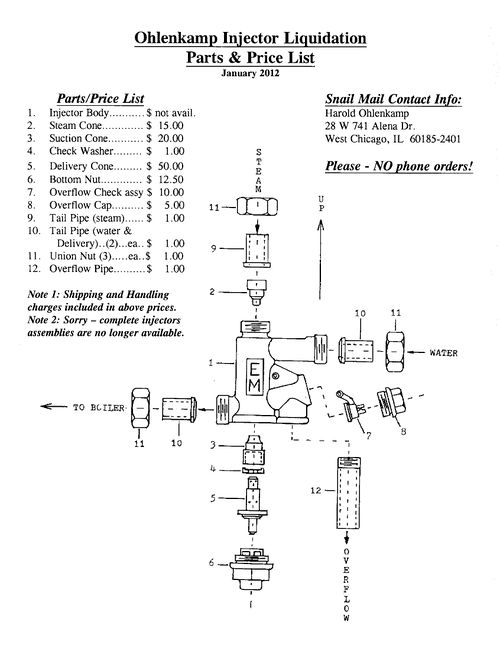
- Harold Ohlenkamp (Emery O's son) is selling spare parts for Ohlenkamp injectors. Please note...complete injectors are NO longer available. However, there is still a supply of fittings, cones, etc. A parts identification price sheet and injector installation instruction sheet are attached for reference. When the parts are gone...they are gone forever. It was Emery's wish that any and all associated tooling be destroyed after his passing. Harold is simply selling off the remaining parts and pieces he has in stock. At some point, remaining inventory will be discarded.
- Live steamers are welcome to contact Harold (snail mail ONLY). Harold would prefer this method of contact since his wife is not in the best of health and Harold wants to be sure any messages/orders are not lost. If you provide a phone or email address, he may contact you directly. Harold's mailing address is listed on the price sheet.
Ohlenkamp Injector Installation
Posted by Carl B. on Chaski.org:
Injector must be mounted in a vertical position. The steam pipe should be on an independent line and connected to the boiler at the highest and closest possible point. A ball valve that opens full flow in 1/4 turn in ideal as a steam supply valve. 5/16 inch outside diameter tubing is a good size for all piping to the injector and also as a delivery line.
The water supply line should have a good capacity, fine mesh strainer and a shut off valve to regulate the water supply.
The injector should be mounted low so that the water will flow by gravity to it from the tender. This will cool the injector in case it gets hot and refuses to pick up. The injector is designed to lift but reliability is lost for the above reason if it is mounted high.
The delivery line should be direct and straight with as few elbows as possible. There should be at least one check valve in this line as well as a shut off valve. The shut off valve should be between the check valve and boiler so that the check valve can be serviced in case of sticking or leakage. A leaking check valve will blow back and overheat the injector causing it to not pick up.
The tail pipes are tapped 5/16 inch 27 threads-per-inch tapered thread. These pipes can be bored out for 5/16 inch diameter to slip into for about 1/2 inch and then the joint silver brazed.
DO NOT LOSE THE STEAM CONE. It may fall out when the union nut is unscrewed from the top of the injector. Note that the tail pipe seats on the steam cone and has a flat face instead of a radius as the other 2 have. The suction and delivery pipes have a radius to match the seat in the body.
It is important that the water supply connections as well as the valve stem packing do not leak air. Any air leakage will cause th einjector to quit.
Capacity will vary with different conditions but is about 2 quarts per minute at 125 P.S.I.
After a time the cones will be coated with lime and minerals from the water supply and need to be removed and cleaned in vinegar or acetic acid solution. The steam cone is tapped 10-32 and can be removed by pulling it out with that size screw.
The next step is to unscrew the 7/16 inch square nut on the bottom and the delivery cone will come out with it. Take care not to loose the 11/32 inch diameter wasther that is on this cone. This washer should be a free sliding fit on the cone. It has a tendency to lime up and stick solid. Note that it has a raised lip or seat on one side and this should face up towards the suction cone above it. Do not use tools on this washer to free it as you will damage it. Use fingers only along with the vinegar treatement.
To separate the delivery cone from the nut proceed as follows: Grasp the nut with thumb and fingers of one hand and the cone the same way with the other hand and with a pulling and slightly wiggling or back-and-forth bending motion the 2 parts will separate. Now you can look through the cone to look for blockage and also the acid can get to all of the parts. Use a wooden tooth pick to help a bit. Do not use metal inside the cones.
The suction cone is a press fit in the body and is best not removed or it may be damaged and a new one needed.
Do NOT LEAVE IN THE ACID MORE THAN A COUPLE OF HOURS. The acide will attack the cones after the line is gone and ruin them. The acid will act much faster if it is heated.
Be very careful not to drop the cones on a hard surface or the edges will be damaged.
Below about 100 P.S.I. the water feed needs to be gradually restricted as the pressure drops or water will dribble or run from the overflowl.
