Building Tank Cars: Difference between revisions
No edit summary |
No edit summary |
||
| Line 11: | Line 11: | ||
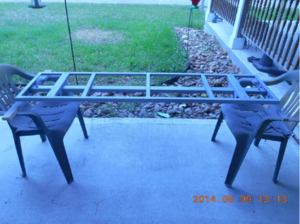
Next comes the upper part of the frame consisting of 1 inch angle iron. These are welded together forming a rectangular frame work that will eventually sit on top of the spine or backbone of the car. The upper frame work or sub-assembly is placed on top of the lower frame work and all is welded together. My frames are generally 15 inches wide by how ever long they need to be for the tank car. | Next comes the upper part of the frame consisting of 1 inch angle iron. These are welded together forming a rectangular frame work that will eventually sit on top of the spine or backbone of the car. The upper frame work or sub-assembly is placed on top of the lower frame work and all is welded together. My frames are generally 15 inches wide by how ever long they need to be for the tank car. | ||
[[File:GaryBrothers welded tank car frame 20140509.PNG|thumb| | [[File:GaryBrothers welded tank car frame 20140509.PNG|thumb|right|300px|Frame drilled and ready to mount the tank saddles, etc.]] | ||
At this time, the stirrups can be either welded on all four corners and in the centers or bolted on. Also, dummy air tanks can be placed where desired. Mine are created from smaller PVC end caps and all glued together. They are mounted to the underside of the frame using flat aluminum bolted and small bolts into the "tanks" threaded into the bodies. The PVC will take bolt threads, usually 6-32 threads. Also the bracket has holes that are bolted to the frame again taping into the frame with a 6-32 tap. | At this time, the stirrups can be either welded on all four corners and in the centers or bolted on. Also, dummy air tanks can be placed where desired. Mine are created from smaller PVC end caps and all glued together. They are mounted to the underside of the frame using flat aluminum bolted and small bolts into the "tanks" threaded into the bodies. The PVC will take bolt threads, usually 6-32 threads. Also the bracket has holes that are bolted to the frame again taping into the frame with a 6-32 tap. | ||
Revision as of 14:17, 7 September 2015
Gary T. Brothers

From "Stack Talk", September and November 2014, Houston Area Live Steamers.
All the tank cars need a frame to start with. Mine normally use a 1 by 2 inch rectangular steel tubing with shorter pieces creating a "tee" on both ends. The rectangular tubing is 1/4 inch longer on both ends so that the frame sticks out beyond the car ends. Spacing the shorter pieces of rectangular tubing between 7 and 8-1/2 inches from the end and welding all together. A hole is drilled at the center of both tees to place a 3/8 inch bolt then weld the head to the frame. The bolt sticks thru to hold the trucks in place and then a lock nut or cotter pin to keep the truck from falling off if the car is picked up to rerail. With Tom Bee trucks I add a 3/8th inch thick 2 inches wide and 7 inches long centered on the tees to keep the coupler height at the proper height from the rail.
Also, 3/8th inch holes are drilled in both ends depending on which coupler is used, between 1-3/4 to 2-1/2 inches from the end. I usually weld a lock nut on top of the frame and run the bolt from the bottom through the coupler to hold it in place.
Next comes the upper part of the frame consisting of 1 inch angle iron. These are welded together forming a rectangular frame work that will eventually sit on top of the spine or backbone of the car. The upper frame work or sub-assembly is placed on top of the lower frame work and all is welded together. My frames are generally 15 inches wide by how ever long they need to be for the tank car.
At this time, the stirrups can be either welded on all four corners and in the centers or bolted on. Also, dummy air tanks can be placed where desired. Mine are created from smaller PVC end caps and all glued together. They are mounted to the underside of the frame using flat aluminum bolted and small bolts into the "tanks" threaded into the bodies. The PVC will take bolt threads, usually 6-32 threads. Also the bracket has holes that are bolted to the frame again taping into the frame with a 6-32 tap.
At this time, locate where the tank saddles will go and mount to frame at the two body bolsters. Drill holes now where the tank straps will be as this will be easier now than later. Other holes to the frame can also be drilled now such as placard holders and brake wheel assemblies.
If safety chains will be a part of the car, then the locations for the eye bolts are drilled.
